
Disclosure: This post contains affiliate links. If you buy through them, BloomBabe may earn a small commission at no extra cost to you. As an Amazon Associate, I earn from qualifying purchases. We only recommend gear we’d use on our own plants.
Somewhere around your fourth Alocasia, you stop blaming yourself and start blaming your house. The crispy edges, the stalled new growth, the leaf that unfurled beautifully in July and then sulked all winter — that’s not a skill problem. That’s a 35% humidity problem, and no amount of misting is going to fix it.
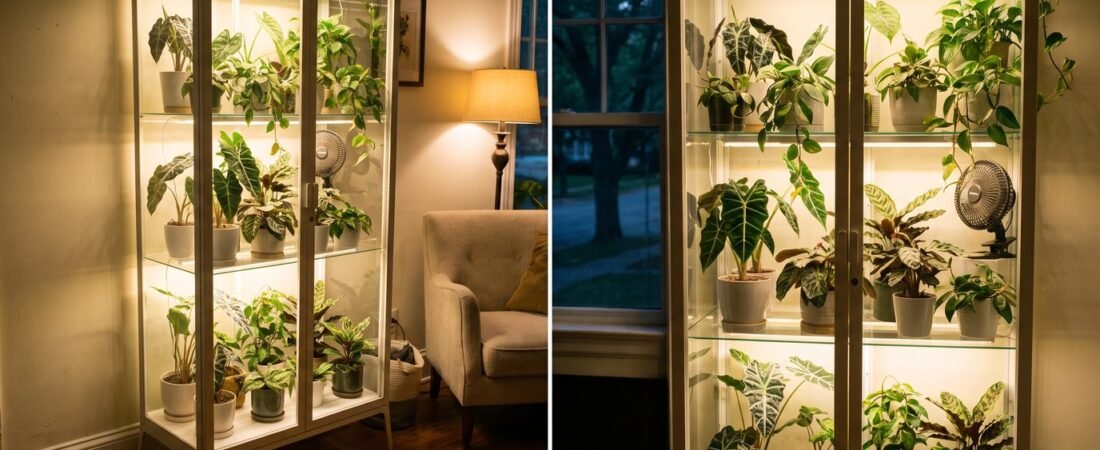
The fix is a box. Specifically, a glass-front cabinet you can seal, light, and hold above 60% humidity while the rest of your home stays a comfortable, non-swampy place for humans to live. IKEA happens to make several cabinets that are almost exactly right for this, which is why the plant internet has quietly turned a furniture catalog into a greenhouse catalog.
But they are not interchangeable. One of them seals in an afternoon. One of them will fight you for a week. One of them is genuinely not safe with a toddler in the house unless you anchor it. Here’s how to pick.
What to Look For in a Cabinet
One door beats two. This is the single biggest thing nobody mentions. A cabinet with two doors that meet in the middle has a vertical seam running its full height, and that seam is where your humidity leaks out. It’s fixable with weather stripping tape, but a single-door cabinet starts you closer to the finish line.
Depth decides what you can grow. Most of these cabinets run around 14 inches deep. That’s a six-inch nursery pot plus a little breathing room — fine for most aroids, tight for anything with a wide leaf span. Measure your actual pots before you fall in love with a photo.
Check that a light bar fits. Standard LED grow light bars come in two-foot and four-foot lengths. A cabinet with a 26-inch interior takes a two-footer with room to spare and a four-footer not at all. Know your number before you order lights.
Glass shelves are the weak link. Nearly every cabinet ships with tempered glass shelves that block light to the level below and stop airflow dead. Swapping in acrylic shelves with extra brackets is the upgrade that makes the whole thing work, and it’s what lets you set shelf heights where your plants need them instead of where the factory drilled.
Tall and narrow means anchoring. A skinny glass cabinet full of wet pots is top-heavy. Every one of these should be strapped to a stud with an anti-tip anchor kit — not a someday task, a day-one task.
Assume you’ll drill it. A clean build routes cords through a hole in the back or base rather than pinching them in the door. That means a cordless drill and a step drill bit, finished with a cord grommet so it looks deliberate.
One note before the picks: IKEA rotates and retires products constantly, and availability differs by country. Everything below has been a staple of the plant-cabinet world, but check your local stock rather than trusting a two-year-old Pinterest pin.
Our Picks by Situation
Best all-around: the MILSBO Tall
The one you’ve seen a hundred times, and deservedly so. It’s tall enough for climbers, narrow enough to slot into a corner, and its metal-and-glass frame doesn’t mind humidity the way particleboard does. Four shelf levels gives you a real collection, not a display of three plants.
Its flaw is that center seam between the two doors. Seal the perimeter and that middle gap with foam tape and you’ll hold 60–75% without much drama. We wrote the entire build out step by step in our IKEA Milsbo Tall greenhouse setup guide — start there if this is the one you’re getting.
Buy it if: you want the standard, well-documented build with the most community knowledge behind it.
Easiest to seal: the RUDSTA
Similar height and footprint to the Milsbo, but with a single full-height door. No center seam, so you’re sealing one hinge side and one latch side instead of an entire vertical crack. Builders regularly report hitting high humidity in a Rudsta with less stripping than a Milsbo needs.
The tradeoff is the swing. One tall door needs a lot of clearance in front, which matters more than you’d think in a small bedroom or a hallway.
Buy it if: humidity is your whole reason for doing this and you’d rather not fight a seam.
Best build quality: the FABRIKÖR
Powder-coated steel, thicker glass, noticeably more substantial than the rest — the cabinet that feels like furniture rather than a project. It runs a bit deeper than the Milsbo and Rudsta in some sizes, which is real breathing room for wide-leafed plants, and the steel frame shrugs off the damp air that eventually gets to cheaper builds.
It’s the priciest of the group and heavy enough that you want a second person for assembly. It’s also the one that looks intentional in a living room instead of looking like a science experiment.
Buy it if: this cabinet is going somewhere guests will see it, and you want to buy once.
Best small starter: a compact glass-door cabinet
You do not need a six-foot cabinet to grow a Philodendron cutting. IKEA’s smaller glass-door cabinets — the BLÅLIDEN-size pieces that sit on a dresser or a side table — make excellent propagation boxes. One short grow light, one hygrometer, and a shallow tray of water is a complete setup, and small volumes hold humidity easily.
Buy it if: you’re testing the concept, rooting cuttings, or you rent and don’t want a piece of furniture you’ll have to move.
Best maximum capacity: a glass-door bookcase
If what you want is volume — a plant wall, not a plant box — a wide bookcase fitted with glass doors gives you more shelf area than any of these cabinets for the money. It’s also the least suitable for high humidity, and I’d rather tell you that plainly: laminated particleboard swells at the edges once it’s damp, and it does not swell back.
Run one of these as a lightly humid, brightly lit shelf rather than a sealed chamber. Skip the weather stripping, keep it near 50–55%, seal the shelf surfaces with a waterproof shelf liner, and it’ll serve you for years.
Buy it if: you have a lot of plants with moderate humidity needs and a wall to fill.
Best budget option, with a caveat: the tall display case
The narrow single-door display cases are the cheapest way into a glass cabinet, and every plant person has considered one. Be honest about what you’re getting: a tight interior that fits a surprisingly small number of pots, a frame that flexes, and a door that needs help to stay shut and sealed. It absolutely must be anchored.
Buy it if: budget is the binding constraint and you’re growing a few small, thirsty tropicals rather than building a jungle.
How to Convert Whichever One You Buy
The cabinet is maybe a third of the project. The rest is the same regardless of which one lands in your cart.
- Assemble, then anchor. Level it first — a cabinet on an uneven floor has doors that won’t sit flush, and no amount of foam tape fixes that.
- Drill your cord hole before the back panel goes on. Low and rear, finished with a grommet.
- Replace the glass shelves with acrylic and set your heights around your tallest plant, not evenly.
- Mount a light bar above every shelf. Strong magnetic hooks hold better than the clips in the box.
- Add airflow before you add humidity. A pair of small USB clip fans moving air across the shelves is the difference between a greenhouse and a mold farm. This is not the step to skip.
- Seal, then measure. Weather strip the door edges, add a humidifier at the bottom, and put a wireless temperature and humidity sensor on each shelf. Levels differ more between shelves than people expect.
- Automate it. Lights and fans on a smart plug, 10–12 hours a day, and you’re done thinking about it.
Frequently Asked Questions
Which cabinet holds humidity best out of the box? A single-door design like the Rudsta, because there’s no center seam to seal. But any of them will hold 60%+ once stripped — the door count changes how much work it takes, not whether it’s possible.
Do I have to swap the glass shelves for acrylic? No, but light and air both stop at glass. If you’re only lighting the top shelf and growing on it, keep the glass. If you want four working levels, swap them.
Will humidity ruin the cabinet? Metal-framed cabinets handle it well. Anything with particleboard shelves or a particleboard back will eventually swell at the edges, so either seal those surfaces or run that cabinet at lower humidity.
How many plants actually fit? Less than the photos suggest. In a Milsbo-size cabinet, plan on three to five six-inch pots per shelf if you want air to move between them. Crowding is how mold starts.
Is the whole thing safe to leave running? With a smart plug on a schedule, fans running whenever the lights are on, and the cabinet anchored to a stud — yes. Check the water level in your humidifier weekly and wipe condensation off the glass when it pools.
Quick Buying Checklist
- 🪟 Your cabinet, leveled and anchored
- 💡 LED grow light bars sized to your interior width
- 🧊 Acrylic shelves + brackets
- 💨 USB clip fans for cross-ventilation
- 💧 Humidifier + weather stripping
- 🌡️ Hygrometer or per-shelf sensors
- 🔌 Smart plug + adhesive cord clips
Pick the cabinet that fits your wall and your patience — the Rudsta if you want the easy seal, the Milsbo if you want the well-trodden path, the Fabrikör if you want it to look like it belongs there. Then give it a weekend, and give your Alocasia the winter it’s been asking for.
Happy growing, from all of us at BloomBabe. 🌿🪟