Disclosure: This post contains affiliate links. If you buy through them, BloomBabe may earn a small commission at no extra cost to you. As an Amazon Associate, I earn from qualifying purchases. We only recommend gear we’d use on our own plants.
Your grandmother had one. It hung in a macramé sling by the kitchen window, arched leaves spilling over the sides, tiny plantlets dangling off it like charms on a bracelet. The Spider Plant has been in homes for well over a century, and it’s still here — not because it’s trendy, but because it’s genuinely good at being a houseplant.
Here’s what makes it worth a spot in your home: it grows fast enough to feel rewarding, it forgives a missed watering, and it hands you free plants without being asked. If you’ve killed things before and it stung, this is the plant that rebuilds your confidence.
Meet the Spider Plant
Spider Plant (Chlorophytum comosum) comes from tropical and southern Africa, where it grows as a clumping perennial in dappled shade. Those thick white roots you’ll notice at repotting time are actually tuberous water storage organs — a drought adaptation, and the reason your plant survives that week you forgot it existed.
The varieties worth knowing:
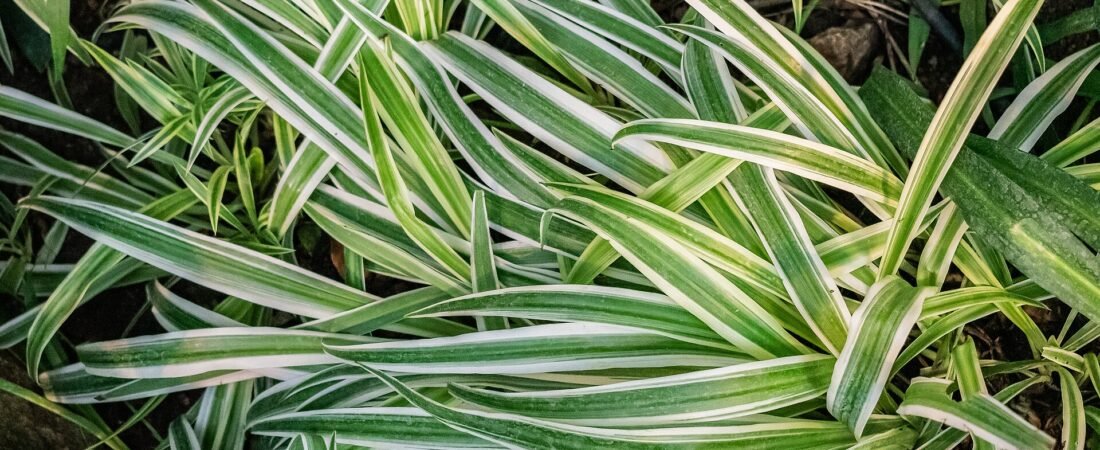
- ‘Vittatum’ — the old-fashioned one, with a creamy white stripe down the leaf center and green margins. This is the classic hanging-basket plant.
- ‘Variegatum’ — reversed: green center, white edges. Slightly slower, a little tidier.
- ‘Bonnie’ — the curly one. Same plant, leaves that kink and spiral. Great for smaller spaces.
- ‘Hawaiian’ / ‘Golden Glow’ — new growth emerges with a champagne-gold blush that fades to green as leaves mature.
- All-green C. comosum — no variegation, and noticeably tougher in low light.
Mature plants send out long wiry stems called stolons, which bloom with small white star-shaped flowers and then form plantlets — the “spiderettes” everyone knows. A happy Spider Plant will do this on its own, usually once it’s a bit root-bound and the days are long.
Light
Bright, indirect light is the sweet spot. An east window is close to perfect. A few feet back from a south or west window also works well.
What to watch for:
- Too little light: stretched, floppy growth, and variegation that fades toward plain green. Fewer babies, or none at all.
- Too much direct sun: bleached, pale patches and scorched edges. Variegated leaves burn faster than green ones because those white stripes have no chlorophyll to protect them.
Spider Plants tolerate low light better than most, but tolerating and thriving are different things. In a genuinely dim room, a small LED grow light on a timer keeps the stripes crisp and the plantlets coming.
Water
Water thoroughly when the top inch or two of soil has dried out — usually every 7–10 days in spring and summer, stretching to every 2–3 weeks in winter. Water until it runs out the drainage hole, then let it drain fully. Never let the pot sit in a saucer of standing water.
Those tuberous roots mean a Spider Plant would much rather be a little dry than a little soggy. If you’re the type who overwaters out of affection, a soil moisture meter settles the argument for you.
About those brown tips. This is the number one Spider Plant complaint, and the cause is usually the water itself, not your schedule. Spider Plants are unusually sensitive to fluoride, chlorine, and salt buildup, all common in tap water and in the accumulated residue from fertilizer. Fixes that actually work:
- Use filtered, distilled, or collected rainwater. A simple water filter pitcher is enough for most homes.
- Flush the pot every couple of months: run water through the soil for a full minute to carry dissolved salts out the bottom.
- Ease up on fertilizer. Overfeeding is the second-biggest tip-browning culprit.
Existing brown tips won’t turn green again. Trim them at an angle with clean pruning snips so the cut follows the natural leaf shape, and judge your fix by the new growth.
Soil
Nothing exotic — a good all-purpose indoor potting mix is genuinely fine here. What matters is that it drains freely and doesn’t compact into a brick. Stir in a couple of handfuls of perlite to loosen it up, especially if your mix feels dense and peaty out of the bag.
Aim for slightly acidic to neutral, around 6.0–7.2 pH. Standard potting soil already lands in that range.
Pot choice: any container with a drainage hole. Spider Plants are traditionally grown in hanging planters so the arching leaves and dangling babies have somewhere to go, and honestly, that’s still the best way to show one off.
Fertilizer
Light and infrequent. A balanced liquid houseplant fertilizer diluted to half strength, once a month through spring and summer, is plenty. Stop entirely in fall and winter when growth slows.
Resist the urge to feed more to fix brown tips or push out babies. Excess fertilizer salts are a cause of brown tips, and plantlet production is driven by light and maturity, not nutrients.
Temperature & Humidity
Comfortable in exactly what most homes already are: 60–80°F. Keep it above 50°F, and away from cold windowpanes in winter and the direct blast of heating or A/C vents.
Average household humidity is acceptable, but 40–60% brings noticeably better leaf quality and fewer crispy edges. If your winter air is desert-dry, group plants together or run a small cool mist humidifier nearby. Skip pebble trays — they do very little.
Repotting
Spider Plants grow fast and fill a pot quickly. Expect to repot every 1–2 years, in spring ideally. Signs it’s time: roots pushing out the drainage hole or lifting the plant up out of the soil, water running straight through, and a pot that dries out within days.
Go up just one size — a jump too big holds too much wet soil. Loosen the root ball, remove any dark mushy roots, and settle it at the same depth in fresh mix.
One useful quirk: being slightly root-bound encourages plantlets. If babies are your goal, don’t rush to upsize.
Propagation
This is the fun part, and the reason Spider Plants get passed between friends for generations.
From plantlets (easiest). Wait until a spiderette has visible nubby root starts on its underside. Then either:
- Root in water — snip the plantlet off the stolon, set it in a jar with just the base submerged, and change the water weekly. Roots appear in 1–3 weeks; pot it once they’re an inch or two long.
- Root in soil while attached — set a small pot of moist mix beside the mother plant and pin the still-attached plantlet onto the surface with a bent paperclip. It roots while the mother feeds it, then you cut the stolon. Highest success rate.
By division. For a big overgrown clump, slide it out and pull or cut it into sections, each with its own roots and leaves. Pot them separately and water lightly for the first week.
New plantlets are thirstier than mature plants while rooting — keep them evenly moist, not wet, and out of direct sun.
Common Problems
- Brown leaf tips — fluoride/chlorine in tap water, salt buildup, over-fertilizing, or very dry air. See the watering section above.
- Pale, washed-out leaves — usually too much direct sun. Move it back from the glass.
- Yellowing lower leaves — some is natural aging. Widespread yellowing with soggy soil means overwatering; check roots for rot.
- No babies — most often not enough light, or a plant that’s still too young. Some varieties also hold off until day length is long. Patience and brighter light fix nearly every case.
- Limp, mushy base — root rot. Unpot, cut away dark rotten roots, repot in fresh well-draining mix, and water sparingly until it recovers.
- Pests — spider mites in dry air (fine webbing, stippled leaves), plus occasional aphids on flower stems and scale. Rinse the plant in the shower, then treat with insecticidal soap or neem oil, repeating weekly until they’re gone.
Frequently Asked Questions
Are Spider Plants safe for cats and dogs? Yes — they’re listed as non-toxic to cats and dogs by the ASPCA, which is a big part of their appeal. Cats are unusually drawn to chewing the leaves, and too much of any plant material can cause vomiting, so it’s still worth hanging yours somewhere out of reach.
Why is my Spider Plant flowering but not making babies? Completely normal, and usually just a timing thing. The small white flowers come first; plantlets form afterward on the same stolon. Give it a few more weeks of good light.
Can I leave the babies on the mother plant? Absolutely. Left alone, they keep growing and the plant becomes a dramatic cascading specimen. It does draw some energy from the mother, so remove a few if the parent starts looking thin.
Do Spider Plants clean the air? They performed well in NASA’s classic clean-air studies, and they’re often recommended for that reason. In a real, ventilated room the effect is small — enjoy it as a bonus, not a reason to buy.
Mine is in a north window and looks sad. Is it doomed? Not doomed, just underlit. Move it to the brightest window you have, or add a grow light. All-green varieties handle dim rooms considerably better than variegated ones.
Quick-Start Gear Checklist
- 🪴 Indoor potting mix + perlite
- 🧺 Hanging planter with drainage
- 💧 Soil moisture meter
- 🚰 Water filter pitcher — the real brown-tip fix
- 🌿 Liquid houseplant fertilizer
- ✂️ Pruning snips
- 🐛 Insecticidal soap or neem oil
- 💨 Cool mist humidifier
Give a Spider Plant a bright window, filtered water, and a little benign neglect, and within a year you’ll have more plants than you know what to do with. That’s the best thing about this one — it doesn’t just survive in your care, it multiplies, and then you get to give it away. Happy growing, from all of us at BloomBabe. 🌱